How To Make Sourdough Starter
Have you always wondered how starter dough is made and have wanted to learn how? Here’s a guide on how to make your own starter for sourdough bread. It takes three ingredients, a lot of love, and can be active within 2 weeks or less! Progress photos and printable schedule included!
The thought of creating a sourdough starter can seem intimidating. I understand, but I encourage you to give it a shot. It’s very simple to make. The key is to have patience. This method can vary, depending on how the cultures form during the fermenting process. Some starters can be active in 1-2 weeks, some can take up to a three. So don’t be discouraged. This guide on how to make a sourdough starter is great for beginners, along with how to care for it.

Sourdough Starter Benefits:
- Gut healthy
- Contains prebiotic & anti-inflammatory properties
- Supports digestion
- Reduces gluten content
- Contains antioxidants
- Produces lactic acid & beneficial bacteria


Days 3: May experience a “False rise” and find bubbles forming on days 3-4, but it is still not ready to use. The photos shown happened after day 2 of feeding, about 12-16 hours later. If bubbles have not appeared after Day 2, it will soon. Give it time!
What to Expect in the First 4 days:
Within the first two days, don’t expect much to happen. The water, sugar, and flour are just beginning to establish for a healthy bacteria to grow. If your starter does happen to have a reaction by having a “false” rise and bubble over the jar, that is great. It doesn’t mean the starter is stable enough to cook with, but it’s a good sign, letting you know that the live cultures are on the right track. By day 4, bubbles may begin to form and your starter may begin to rise but not double in size just yet. Continue the feeding schedule and by day 7, you will have an active starter dough.
If nothing has happened in the first few days, do not be discouraged. This is the “quiet” period, where a wave of bacteria is forming and then dying off to develop the wild yeast. So give it time and continue the feeding schedule as follows. By day 7, you should begin to notice magical changes.
Don’t Let Sourdough Starter Intimidate You
Before making my own starter back in 2023, I had no clue how sourdough worked. I didn’t know the first thing about starter, let alone forming the dough. I was timid and believed I wouldn’t keep it alive for more than a few weeks. That was until I took a trip to Alaska and discovered a book that changed my mind. That book was the Alaskan Sourdough Edition by Ruth Allman. Without hesitation, I bought it, because it was then that I realized how much I wanted to learn how to make sourdough. The one detail that I found most interesting was how adding potato to feed the live cultures can give it an extra boost. I found it fascinating. Although I didn’t use that method to creating mine, I am still thankful for discovering Ruth’s book. It gave me the motivation I needed to try it myself.
This is your sign as well!

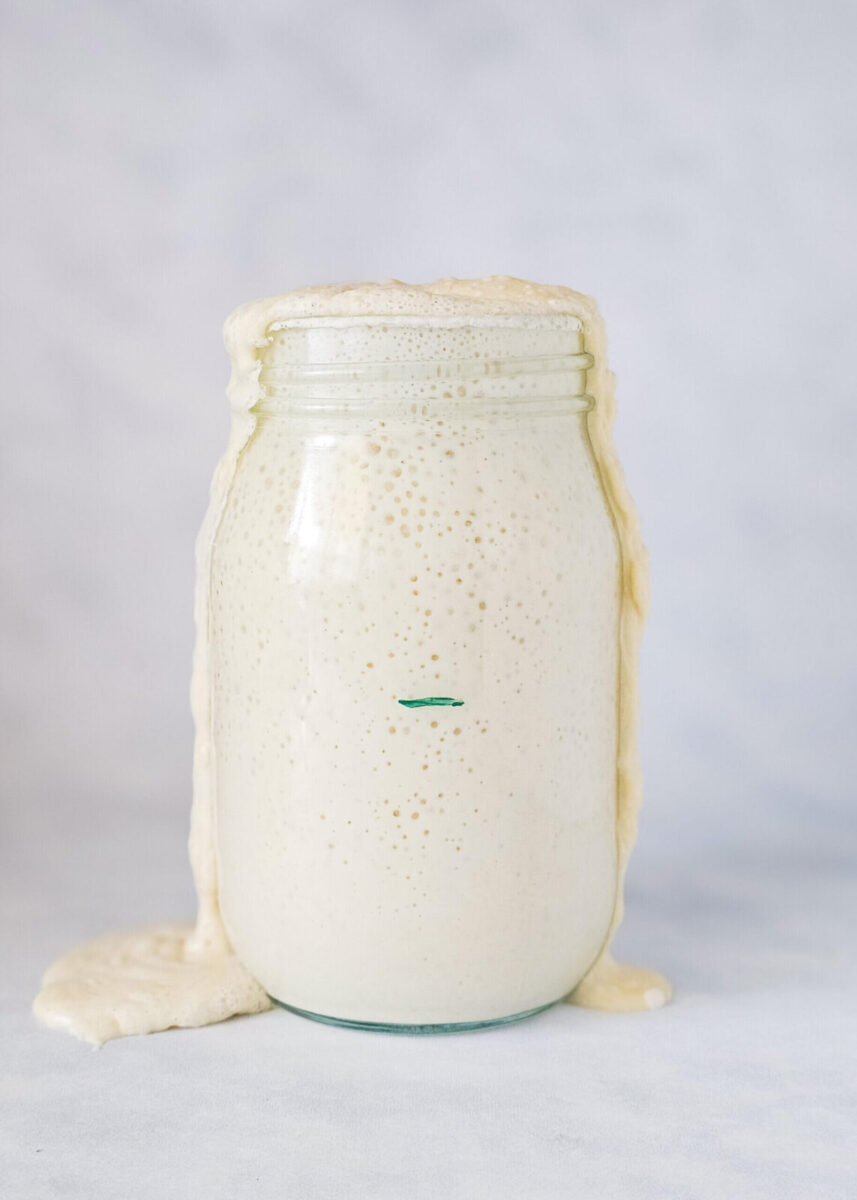
Days 5-6: Green mark indicates where starter settled after last feeding. It’s gradually beginning to rise as the wild yeast and bacteria create carbon dioxide, causing the gas and bubbles to form. Very soon, the rise will double.
Ingredients You Will Need:
- Water- Filtered water is needed for this recipe.
- Flour- Bread Flour or All-purpose will work fine when creating your starter.
- Sugar- This helps boost the live culture and activating the starter.
Types of Flour to Feed Starter:
Once your starter is active, there are variety of flours that can be used to feed the culture. Due to higher proteins and extra nutrients, whole grain and rye are used when feeding and making sourdough bread. It also enhances the flavors of the dough. For a gluten free option, buckwheat is a great option. Flours containing spelt, bran, and germ are other choices used. But for this guide on how to make a sourdough starter, All-purpose or bread flour will work great. You could also split a mixture of different flours together to form your own flavor profile after you are more comfortable with the feeding schedule. Make sure the flour you use to create your starter and feed afterward is unbleached. Bleached flours can lose a lot of the yeast proteins and healthy bacteria during processing and may not feed your starter as well.
Filtered Water is Best
For this guide on how to make your own sourdough starter, I highly recommend only using room temperature, filtered water before and after it becomes active. Distilled doesn’t have enough nutrients, and tap water contains chlorine, which can taint both the outcome and taste of your sourdough. Filtered water doesn’t have chlorine, and it provides the minerals needed. If preferred, using bottled water during the fermentation process can be helpful when creating your starter.


Day 7: Time Frames after feeding.
What Does Starter Smell Like?
During the first few days, the sourdough starter won’t have much of a smell. It will smell like flour and water, or maybe something closer to corn husks. Then as the days pass, the odor will begin to smell more sour. It may smell like alcohol or vinegar. The odor isn’t pleasant, but it means you have a healthy starter.

Day 8: The photo shown above is 12 hours after Day 7 feeding.
Tips Before Beginning Your Starter:
- Use a journal to record feeding times, measurements, and weight for more accuracy.
- Weigh the jar you will be using before adding the ingredients. This can help with accuracy when discarding portions of the mixture before the next feedings.
- Wrapping a rubber band, or simply marking the area of where your starter has settled after feeding can help determine when your starter begins rising. If the live cultures cause the starter to rise passed the rubber band, the starter is becoming active. If it hasn’t, continue feeding and give it more time.
- Don’t worry if your starter doesn’t become active right away. Depending on the temperature of the space and other factors, making active starter can vary. Sometimes it can take 2 weeks before it matures, other times it can take up to 3 weeks. Every starter is different, so patience is key.
- Once the starter active, different types of flours can be used to create personal flavor profiles. Just be sure to check on your starter for the first day or two to see if it is feeding properly. If it doesn’t appear as active or bubbly, don’t worry. Go back to the using all-purpose or bread flour for 2-3 days to help boost it and try again in a couple of days.
- Keep in mind, depending on the time of year you decide to make your starter dough, the fermentation process could react faster or slower based on the temperature. Summer and Fall have shown promising results for me when creating sourdough starter. But if you can create a consistent warm temperature in one spot within your home (about 70-85℉), you could have an easier time making your starter.


Day 10: Starter more than doubled after feeding 4 hours earlier. It’s also beginning to have the familiar “Sourdough” smell.
Books That Help Build Confidence When Learning How To Make Sourdough Bread
While I was waiting for my starter to become active, I distracted myself with these books that changed my life. Not only are they easy to read and informative, but they also have amazing recipes that are simple to follow. These books provide step-by-step guides on how to fold your dough, understand baker schedules, and created the most beautiful loaves. I highly recommend them for yourself, as gifts, or for anyone that is wanted to learn more on how sourdough works.
Free Printable Sourdough Schedule
Click on the link below to print this sourdough starter schedule for additional convenience!

What To Do After Your Starter is Active
After your starter is active and bubbly, check out my guide on How to Maintain and Store Sourdough Starter. It goes into further detail on how to care and properly store your starter. It also provides tips on feeding schedule, explains hooch, and discard.

How To Make Sourdough Starter
Equipment
- 1 (26-24 oz) sealable glass jar with Lid
- 1 Kitchen Scale
- 1 rubber band
- Journal for documenting and notating (optional)
Ingredients
- 100 grams All-purpose Flour (Bread Flour can also be used)
- 15 grams granulated sugar
- 100 grams Filtered Water, room temperature (Do not use distilled or tap water)
Instructions
- Day 1: Mix together the flour, water, and sugar until well incorporated. It will appear as a loose paste. Loosely cover with the lid and set in a cool spot (70-85℉) for 24 hours.
- Day 2: After 24 hours, add in an additional 100 grams filtered water, 100 grams flour, and 15 grams sugar. The mixture may be slightly thicker, but mix until well combined. Loosely cover with the lid again and leave for another 24 hours. During the next 12-16 hours, the mixture may experience a "false" rise. If that happens, it's alright to transfer the starter to another clean jar to continue the fermentation process. This does not mean the starter is ready to be used and is active.
- Day 3: Depending on the state of your starter dough, the instructions vary. If bubbles are beginning to form, uncover the jar and remove all but 100 grams of starter. Repeat the process of mixing in 100 grams water, 100 grams flour, and 15 grams sugar. Loosely cover and leave for 24 hours. If bubbles are not forming on the surface of your starter, do not touch. Leave it alone for another 24 hours. This will allow the bacteria to ferment longer and live cultures to form.
- Day 4: This day will require two feedings, one in the morning and one in the evening, 12 hours apart. For both feeds, uncover and discard all but 100 grams of starter. Add in the 100 grams filtered water, 100 grams flour, and 15 grams sugar. After second feed, leave for 24 hours.
- Day 5: After 24 hours, uncover and discard all but 100 grams of starter. Add in 100 of filtered water, and 100 grams of flour. Mix to combine and leave for another 24 hours.
- Day 6: Repeat the same steps as day 5. Uncover and discard all but 100 grams of starter. Add in 100 of filtered water, and 100 grams of flour. Mix to combine and leave for another 24 hours.
- Day 7: If your starter is bubbling and gradually rising after each feed, congrats! You have an active starter dough. Continue to feed and discard each day as listed on days 5 & 6. The sugar is no longer needed to boost the bacteria.If your starter is not rising just yet, continue feeding as listed on days 5 & 6, but add 15 grams of sugar to one of the days! You got this! Read again when starter is active.
Notes
- Keep in mind, this process can take 1-2 weeks, or possible longer depending on temperature and conditions in the starters environment. That doesn’t mean anything anything is wrong. Your starter just needs a little more time, so continue to care and nurture it until it’s matured and active.
- Once your starter is active, continue to feed for another week or 2 before using it to bake. That way the starter has more time to mature and provide that signature sour taste to your loaves.
- During the first 3-4 days, the mixture may experience a “false” rise. If that happens, it’s alright to transfer the starter to another clean jar to continue the fermentation process.
- Once active, feed daily if left on the counter top or once a week if kept in the fridge. Continue to feed for 1-2 weeks before baking with it.
About Nicole

Hey There! I'm Nicole, and I have been making food for as long as I can remember, from a little girl cooking with her grandmother to making new dishes and using her husband as a taste tester.
